Dave Eve – Installing Portholes
With the addition of portholes, quilted white diamond leather & cup holders member Dave Eve takes his Figaro Refurbishment
to extreme levels!
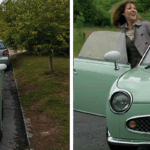
The old-time story of boy meets girl, girl meets Figaro and they fall in love. “with the Figaro” I might add!
About 15 years ago we spotted our first Figaro and thought like many how cute and utterly stylish they were. “I want one” the better half exclaimed. On looking at costs back then a decent example was still above £5,000 which wasn’t justifiable as an extra car. So, the idea was put on the back burner only to be brought up every time a Figaro was spotted (thankfully a rare car).
My partner Yvonne was going through a rough patch as her mum was very ill. In an effort to distract and cheer her up I spotted a very cheap Figaro on eBay. I rang the seller who explained the previous owner had just had engine rebuilt and everything was original some small welding by sill needed doing. He had it for 2 years and never got around to repairing as just after rebuild the head gasket went.
We agreed a price and it was picked up by car transport company. It arrived late evening mid-December.
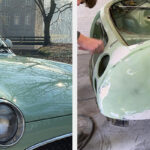
Oh my lord what have I bought? It was awful the paint had black tar like substance all over it sills rotten, arches rusty no bumpers, the interior was as if it had been stored in the titanic, after it sank… barely had the engine grunt to get off trailer.
The look of disappointment on Yvonne’s face was plain to see although she denied it. I on the other hand did not. I had been duped.
Seeing the disappointment, I felt I had if anything made matters worse. So, I searched again this time went to see another one in London. It looked nice bumpers a little rusty as normal small bit of welding by sill. Smoked a bit which I was told was turbo. I have an entire spare car I thought this is much better on the eye. I bought her and drove back home.
Yvonne was much happier with this one. It looked like a car not a rusty canal boat. After a few weeks, I put her upon the lift to see if anything needed doing other than the sill. It was like a horror show and this is the sequel. Both sills rotten. Floor pan rotten in so many places it looked like a rusty trellis fence. The arches didn’t feel right from inside they looked rusty and holed. I set to work with hammer and found that the rear wing and arches had been filled with about 2 inches of filler (to be fair it was an outstanding bit of sculpting I couldn’t tell from outside that it was getting eaten from the inside out.
Decided as it was going to be one of the family I would do a full as best I could restore. With the help of a lot of the guys n gals on the forum and club in general I started the task which took 6 months to complete.
I ordered lots of new parts to include. Sills. Wheel arches. Metal sheet for floor repair. Full service kit. Cambelt kit. Water pump. Thermostat. Radiator cap. Steering pinion repair kit. Steering gators. Ball joints. Crankcase seals. Turbo. Vacuum hoses. Full silicon water hose set. Gasket set. Full large leather restore kit. Tiger seal (thanks Kevin) chrome strip accents. 15 metres of white diamond quilted leather. Double din Sat Nav Radio with hands free and reversing camera. Switches for boot release and fog light. Remote Central door locking kit.
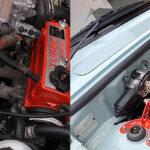
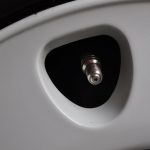
When I was planning I wanted to keep the oldie retro style as much as possible and improve (in my opinion) on the little bits that let the car down . Mainly Japanese chrome bits. I changed the washer jets, door pins and wing mirrors to solid chrome..
I didn’t like the way the normal stereo just sits awkwardly on bottom of dash it just didn’t match the curves of the rest of car so I made a console from aluminium to fit radio in, that sloped from dash to gearbox area.
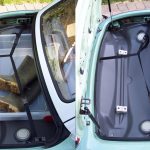
Yvonne and myself fitted the leather to the door cards and each panel we took from car we even made the tonneau cover to match.
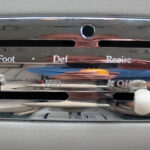
The boot release for the hood was a bit awkward if you have a bad back so I moved it up to the dash in new stainless button and fitted a flush button for the integrated fog light. All lights changed to led bulbs including headlight. New bright blue for air con light. Fitted central locking solenoid to doors and wired into alarm system. Re-tensioned seat belts as getting a bit worn out. Dyed the carpet black. New floor mats. Made some white plastic wheel shields for rear wheels to stop as much future problems as possible. Undersealed with 5 thick coats. New exhaust rubbers.
The name of Figaro is “Glennis” after Yvonne’s late mother. We cut this with my plotter cutter out of chrome vinyl wrap. She has been resprayed diamond white which has yet to cure then it will be sanded back and a white pearl put over the top in about 4 weeks.
As Yvonne is a new driver I fitted the reversing camera to assist her and didn’t want all brackets and holders scattered about for using hands free phone and sat nav. This way although a bit too modern looking it stops a lot of clutter.
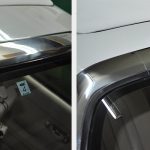
THE PORTHOLE!
I don’t know if it’s just me but I find the area behind seats on side of roof to be a huge blind spot 12 or so inches of metal that stops me seeing if anything is coming. So I have looked everywhere hundreds of Figaro pictures all the member photos and spoke to the Figaro shop.
And to my knowledge no one has implemented my solution! I have fitted two small chrome porthole window into this section of roof pillar so it makes visibility better.
I’m sure it’s a story you have heard so many times regarding Figaro ownership. But it’s better to keep these on the road than scrap them. Hard work but worth it in the end. Official name Glennis.
My name for her. THE MONEY PIT
Related posts:
 Club Members Figaro used in the Sarah Jane Adventures TV Series
 Strut Brace – fitting to a Nissan Figaro to improve handling video
 Heater Knobs – replacement set of 4 for a Nissan Figaro video
 Dennis Case – Stripped To The Bone
 Cleaning – Windscreen Surround how to polish on a Nissan Figaro video
 Number Plates – Front & Rear Sizes
 Valve – Extension Caps
 Boot Liner