Electric Nissan Figaro – 2025 Paul Jones
Paul Jones is the latest innovator to be creating a viable electric Figaro conversion.
BUILDER: PAUL JONES
Builder: Paul Jones
Country: Wales
Email: rhydavonpaul@outlook.com
Date: 15/10/2025
Name: Frankie
Range: 120 Miles
Charge Time: 4 hours
Battery Type: Lithium from VW ID Buzz
Mission: To create a usable and repeatable electric Figaro conversion
Backstory. My wife has always been a Figaro fan and has had two in the past, a Topaz Mist and a Grey (which was sadly written off!) After a brief spell using my new electric BMW i3 in 2014, she decided that it should now be hers and commandeered it, which led to a succession of new electric cars, including another BMW i3 and a Honda E. With her retirement looming, we came up with a plan. Why not get another of your favourite cars, a Figaro, and bring it up to date by electric-converting it? A quote of £50,000 from a reputable conversion company sent me down the route of doing it myself. How hard could it be? Very hard, as it turned out!
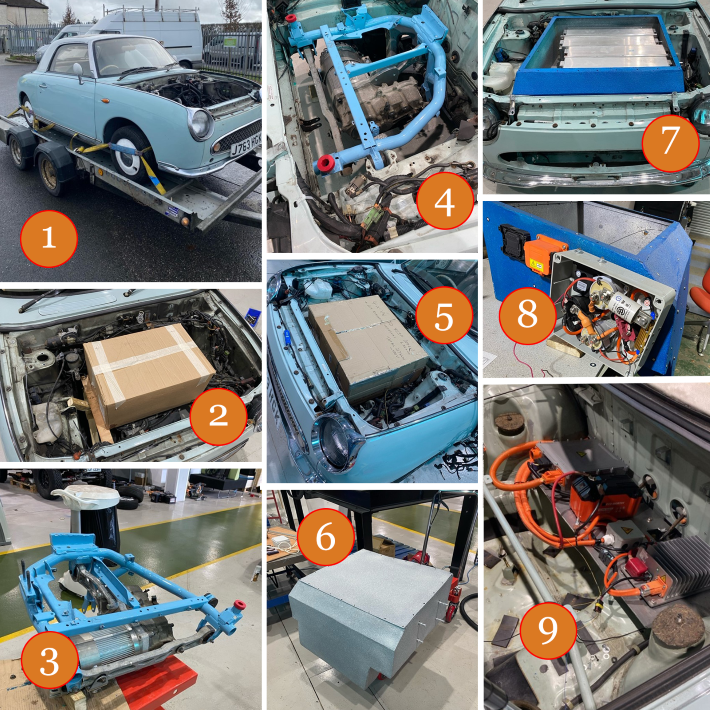
The first challenge was finding a cheap, rust-free Figaro, not exactly an easy task, as the thought of doing a body restoration and an electric conversion seemed like a task that would take the rest of my life! After about two years of searching, a candidate was found in a shipping container with a blown engine, exactly what I was looking for!
SEE PICTURE 1 BELOW.
The obvious place to start would be to transplant the whole package out of a Nissan Leaf, motor stack, batteries, etc. I realised very quickly, helped by James Brown, that this was impossible: the motor stack would be sticking out the top of the bonnet by about a foot, and the battery pack would have taken up both boots and necessitated the removal of all four seats, hardly a practical proposition.
I decided to find the most compact motor/gearbox combination with the most modern, energy-dense batteries available.
Initial attempts using CAD and WAD (Cardboard and Wood Aided Design) SEE PICTURE 2 BELOW.
Various pieces of Mitsubishi and Toyota components were test-fitted to no avail. Nothing really fitted well enough to be viable. I had, however, decided to bite the bullet and source a motor (Hyper9) and some batteries (4x VW ID Buzz modules.) By now, I had invested enough money that I had to find a way to do it! The breakthrough came when the batteries were shipped from Northern Ireland, and I asked the company to send a subframe from the smallest electric car I could find. I only did this to give me ideas of how to mount the motor into the car, but to my surprise, this subframe fitted inside the Figaro engine bay! With the addition of the original Figaro engine mount,s this could be a good starting point, using the original gearbox (reduction unit) that matched the subframe and adapting the motor to fit the subframe /gearbox.
The compact drivetrain. Hyper 9 motor with a custom adapter and coupler attached to the reduction gearbox and attached to the subframe. Note that the original Figaro engine mounts are welded to the subframe, and the battery box can sit on top of this structure. No holes or welding to the car structure are allowed, hence the use of the original engine mounts, albeit with new, stiffer bushes. SEE PICTURE 3 BELOW
Here is the drive train bolted into the Figaro engine bay. It looks like it was always meant to be this way. SEE PICTURE 4 BELOW.
I’d decided that 4 battery modules, totalling 27kwh, would be the minimum acceptable to get a sensible range. At 30V each, four modules in series give 120V, which is perfect for the Hyper9 motor to run on. The next step is to design a battery box, which must be steel, basically blast and fireproof.
More CAD, first battery box mock-up. SEE PICTURE 5 BELOW.
Battery box v1. It’s a weird shape because the space left is weird!. Note pipe outlets to allow for battery cooling. SEE PICTURE 6 BELOW.
Here is v2 of the battery box in place with the modules inside. There is now a lot of stuff packed under the Figaro bonnet, but there is still a lot of equipment to fit in the car to make it work. SEE PICTURE 7 BELOW.
This was the easy part! I’m familiar with modifying cars and fabricating things but what came next was the biggest wiring job I had ever undertaken, especially when I have no electrical training or qualifications! I do have a friend who has done a conversion whom I could contact occasionally when I get stuck or confused. I’ve only included a few photos of the main parts.
Junction box. Includes the contactors which bring the high voltage circuits to life, mounted to the side of the battery box. Next to it is the main service disconnect, which can be used to disconnect the batteries when you’re working on things. The black thing is the blast vent, a requirement for when things go bad! SEE PICTURE 8 BELOW.
Bottom boot area behind the spare wheel. Includes the Main battery charger, which takes mains voltage from the charging socket mounted where the fuel filler used to be. DC – DC converter, uses 120V from the main battery pack to power the 12V circuits for lights etc. A tiny 12V battery. The high voltage cables are threaded through the vehicle using existing holes to the engine bay. SEE PICTURE 9 BELOW.
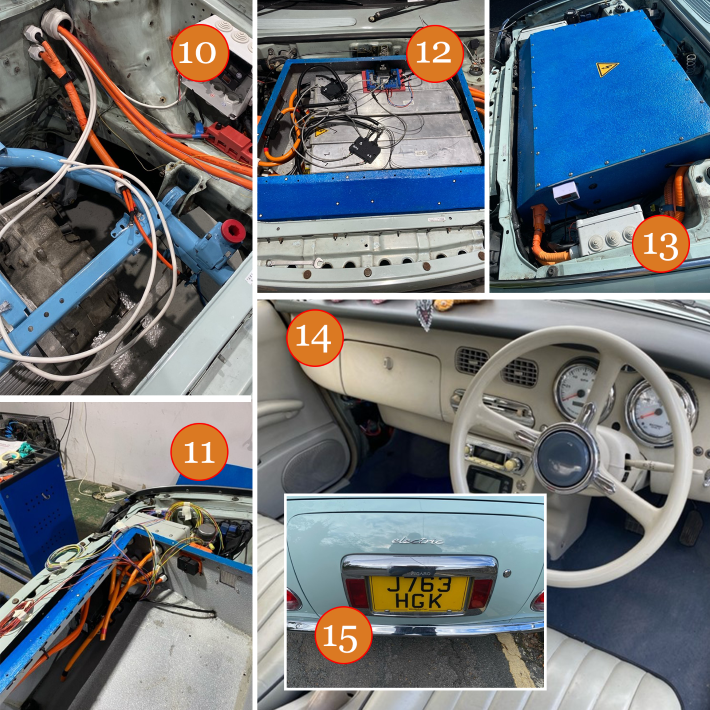
Passenger side of the engine bay. Note wiring threaded through the existing engine loom hole and high voltage heater wiring through ac pipe holes. The junction box is for the high-voltage heater. SEE PICTURE 10 BELOW.
The motor controller is buried in a dark corner of the battery box. The small wires are for controlling the motor, but are not connected at this stage. SEE PICTURE 11 BELOW.
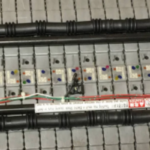
EMUS BMS is now installed. This monitors and controls all 32 cells in battery modules. Monitors the battery modules during the charging process. SEE PICTURE 12 BELOW.
Battery box buttoned up. Note the Tesla electric brake servo at the top of the picture and the humidity monitor (white) at the bottom of the pic. It’s important that the battery and control systems are kept dry, and this allows me to keep an eye on them. Note that the washer fluid reservoir has been relocated to under the wing! SEE PICTURE 13 BELOW.
Interior shot including new gauges, motor controller, gear lever etc. SEE PICTURE 14 BELOW.
The only giveaway. SEE PICTURE 15 BELOW.
I haven’t included other bits and pieces such as the heater box, cooling system, Prius throttle pedal, Aliexpress gear lever, driveshafts, suspension changes etc, just to keep theings simple. I hope this gives everyone an idea of how involved the process is and why it costs so much. I’ve bought about £15k of components and have spent about 1000 hours on this car.
Outstanding stuff:
1. Had no room to fit an electric power steering pump so switched to a K10 Micra steering rack instead. The steering is fine now. A car as light as a Figaro shouldn’t need power steering and it would reduce range.
2. Air conditioning – a future project which I think can be done at a cost.
3. Second battery box in rear to increase range.
The car has an MOT and has been approved by DVLA as an electric vehicle and is now in daily use!
If anybody else is brave enough to want a Figgy converted, contact Paul at rhydavonpaul@outlook.com
Update 18th February 2026
Electric Figaro has just passed 1000 miles!